
Amish Apple Fritter Bread Recipe Straight From the Farm
Sweet, soft, and deeply satisfying, it carries the kind of honest, homestyle charm that never goes out of style.
Rooted in simple country baking traditions, it has a timeless quality that appeals to just about anyone with an appreciation for good food.
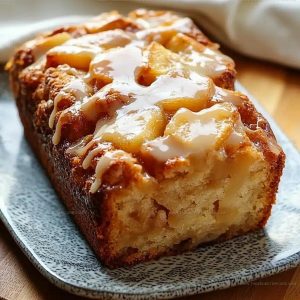
Every slice looks almost too good to slice into, with a beautifully swirled interior and a golden, slightly crisp top that speaks for itself.
It pairs wonderfully with a hot cup of coffee or tea, making it a natural fit for slow mornings or cozy weekends.
Baking it at home fills the kitchen with the most inviting aroma, and the payoff is absolutely worth it.
What Makes Amish Apple Fritter Bread a Great Pick
What Ingredients Need Preparing Before Amish Apple Fritter Bread
Dry Ingredients:Wet Ingredients:Apple Mixture:Amish Apple Fritter Bread Tool Collection
How To Prepare Amish Apple Fritter Bread
Heat Your Oven
Get your oven ready by setting it to 350°F. While that’s warming up, take a 9×5-inch loaf pan and grease it well with butter or cooking spray, or line it with parchment paper so your bread comes out easily when it’s done baking.
Mix Your Dry Base
In a large bowl, combine these ingredients together:
Whisk everything together so the ingredients are evenly distributed throughout your mixture.
Blend Your Wet Ingredients
In a separate bowl, whisk together these items until they’re combined:
Make sure there are no lumps and the mixture looks smooth.
Combine Wet and Dry
Pour your wet mixture into the bowl with your dry ingredients. Stir gently with a spatula or wooden spoon until everything just comes together.
Stop stirring once you don’t see streaks of flour anymore; overworking the batter makes the bread tough, and that’s not what you’re going for.
Prepare Your Apples
Peel and dice your apples into small pieces.
In a medium bowl, toss your diced apples with these ingredients:
Coat the apples evenly so every piece gets flavored.
Layer Your First Batter
Pour half of your batter into the prepared loaf pan, spreading it to cover the bottom evenly.
Add Your First Apple Layer
Spoon half of the apple mixture over the batter layer in your pan, distributing it as evenly as you can.
Add Your Second Batter Layer
Pour the remaining batter over the apples, smoothing it out to create an even layer across the top.
Top With Remaining Apples
Spread the rest of your apple mixture over this second layer of batter.
Create A Swirl Effect
Take a knife or skewer and gently run it through the batter in a few places, creating a marbled pattern.
Don’t go overboard with this; a few swirls are enough to blend the layers slightly without mixing everything together.
Bake The Loaf
Place your pan in the 350°F oven and bake for 50 to 55 minutes.
The bread is finished when a toothpick inserted into the center comes out clean or with just a few moist crumbs clinging to it.
Cool In The Pan
Once it comes out of the oven, let the loaf sit in the pan for 10 to 15 minutes.
This resting time helps it set and makes it easier to handle without falling apart.
Finish Cooling
Turn the bread out onto a wire rack and let it cool completely.
Once it’s cooled all the way, it’s ready to slice and serve.
Cooking Tips For Better Amish Apple Fritter Bread
What Classic Variations Fit Amish Apple Fritter Bread?
Presenting Amish Apple Fritter Bread Beautifully
Fresh Storage Tips For Amish Apple Fritter Bread
FAQs
Can I use other types of apples for this bread?
Different apple varieties work great here. Granny Smith apples give a tart flavor, while Honeycrisp apples add sweetness. Mixing two types gives you a balanced taste that really comes through in each bite.
What happens if I overmix the batter?
Overmixing develops gluten, which makes your bread tough and dense instead of light and tender. Stir just until the dry ingredients disappear, and your bread texture turns out much better.
Do I need to peel the apples?
You don’t have to peel them, but peeling gives a smoother texture. If you leave the skin on, chop the apples into smaller pieces so they cook through evenly.
Can I make this in a different pan size?
A 9×5-inch loaf pan works best for this recipe. Using a different size changes baking time; smaller pans bake faster, larger ones take longer. Check for doneness starting at 40 minutes if using a different pan.
What does the swirl do to the bread?
The swirl mixes the cinnamon-sugar apples throughout the batter, creating those pretty lines in each slice. It also helps distribute the apple flavor evenly without overworking your dough.
Amish Apple Fritter Bread Recipe
- Total Time: 70-80 minutes
- Yield: 8 1x
Description
Amish apple fritter bread blends warm spices and tender apples in a loaf that tastes like a cinnamon-sugar-coated pastry, and you get a simple way to make bakery-quality results at home with ingredients you probably have in your kitchen right now.
Ingredients
Dry Ingredients:
- 2 cups all-purpose flour
- 1 tablespoon baking powder
- ½ teaspoon salt
- 1 teaspoon ground cinnamon
Wet Ingredients:
- 1 large egg
- ½ cup milk
- ½ cup vegetable oil
- 1 teaspoon vanilla extract
Sweeteners and Apple Mixture:
- ½ cup granulated sugar
- ¼ cup brown sugar, packed
- 2 cups peeled and diced apples
- 1 tablespoon lemon juice
- 1 teaspoon ground cinnamon
- ¼ cup granulated sugar
Instructions
- Heat your oven to 350°F (175°C) and grease a 9×5-inch loaf pan with butter or cooking spray.
- Combine 2 cups all-purpose flour, ½ cup granulated sugar, ¼ cup packed brown sugar, 1 tablespoon baking powder, ½ teaspoon salt, and 1 teaspoon ground cinnamon in a large bowl, whisking until everything is evenly distributed.
- In a separate bowl, whisk together 1 large egg, ½ cup milk, ½ cup vegetable oil, and 1 teaspoon vanilla extract until the mixture looks smooth.
- Pour your wet ingredients into the dry mixture and stir gently until the batter just comes together – stop before it becomes completely smooth.
- Toss 2 cups of peeled and diced apples with 1 tablespoon lemon juice, 1 teaspoon ground cinnamon, and ¼ cup granulated sugar in a medium bowl until the apples are fully coated.
- Spread half of your batter into the prepared pan, then layer half of your apple mixture on top.
- Add the remaining batter over the apples, then finish with the last of your apple mixture on top.
- Run a knife or skewer through the layers a few times to create a swirled pattern, being careful not to overwork it.
- Place the pan in your 350°F (175°C) oven and bake for 50-55 minutes until a toothpick inserted in the center comes out clean.
- Let the bread sit in the pan for 10-15 minutes after removing it from the oven, then turn it out onto a wire rack to finish cooling completely.
Notes
- Don’t overmix your batter once the wet and dry ingredients come together, as this can make your bread tough and dense instead of tender and moist.
- Toss your diced apples with lemon juice right away to prevent browning, and the acid also brightens the apple flavor throughout the bread.
- Use a knife or skewer to create just a few gentle swirls through the layers rather than over-swirling, which keeps those distinct apple pockets visible and flavorful in each slice.
- Let the bread cool in the pan for about 10-15 minutes before turning it out, as this gives it time to set so it doesn’t fall apart when transferred to the cooling rack.
- Prep Time: 20-25 minutes
- Cook Time: 50-55 minutes
- Category: Donuts & Breads
- Method: Baking
- Cuisine: American
Nutrition
- Serving Size: 8
- Calories: 235 kcal
- Sugar: 15 g
- Sodium: 190 mg
- Fat: 10 g
- Saturated Fat: 1.5 g
- Unsaturated Fat: 8.5 g
- Trans Fat: 0 g
- Carbohydrates: 33 g
- Fiber: 2 g
- Protein: 3 g
- Cholesterol: 30 mg
Wanda Hamilton
Founder and Recipe Editor
Expertise
Bold Weeknight Cooking, Pantry Powered Meals, Sauce and Spice Building, Seasonal Ingredient Swaps, Recipe Testing and Troubleshooting, Food Photography and Simple Styling
Education
- Degree: Associate of Applied Science in Culinary Arts
- Focus: Core culinary skills built through practical kitchen training, with a strong foundation for real service work.
National Registry of Food Safety Professionals (NRFSP)Wanda Hamilton, Founder and Recipe Editor, cooks from Savannah, GA with a “big flavor, low fuss” mindset. Trained in Culinary Arts at Bellingham Technical College and certified in food safety through the NRFSP, she blends professional skill with everyday practicality. Wanda is known for smart finishing touches that elevate a dish in minutes, along with rigorous testing standards and clear visual cues that remove the guesswork. Her goal is simple: make every meal feel like a small but satisfying upgrade to your day.