
Amish White Bread Recipe With Tender Crumb
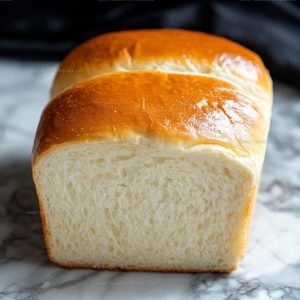
Amish white bread has been a cherished staple in traditional kitchens for generations, beloved for its soft texture and subtly sweet flavor that makes it absolutely perfect for sandwiches, toast, or simply enjoying on its own.
What makes it so special is how reliably it turns out tender and fluffy while still being wonderfully versatile for any meal of the day.
Homemade loaves like this one fill your home with an inviting aroma that store-bought versions simply can't match.
The recipe comes together more easily than you might expect, proving that baking from scratch doesn't have to be intimidating or time-consuming.
Slicing into a fresh loaf reveals that pillowy interior everyone loves, making it hard to resist eating it while still warm.
Once you experience how satisfying it feels to serve bread made in your own kitchen, returning to commercial alternatives becomes nearly impossible.
Why Should You Try Amish White Bread
Ingredient Breakdown for Amish White Bread
Base Ingredients:What Tools Do You Need for Amish White Bread
Step By Step Directions To Make Amish White Bread
Wake Up The Yeast
In a large mixing bowl, combine 2 cups of warm water (110°F/45°C) with 2/3 cup of granulated sugar and stir until the sugar dissolves completely. Sprinkle 1 ½ tbsp of active dry yeast over the top and let it sit undisturbed for 5-10 minutes.
During this time, the yeast gets bubbly and foamy on the surface, which tells you it’s ready to go.
Blend In The Oil And Salt
Now that your yeast mixture is frothy, add 1/4 cup of vegetable oil or melted butter and 1 ½ tsp of salt to the bowl.
Stir these together gently so everything combines.
Start Adding Flour
Begin mixing in your flour gradually.
Start by stirring in 3 cups of all-purpose flour, mixing until the texture becomes smooth. Then keep adding more flour in 1/2 cup portions, stirring after each addition.
Your goal is to get a soft dough that pulls away from the bowl’s sides but still feels a bit sticky to the touch. You’ll need between 5 ½ and 6 cups of flour total, depending on humidity in your kitchen.
Knead The Dough
Turn your dough out onto a floured surface and knead it for 8-10 minutes using your hands. If you have a stand mixer, attach the dough hook and mix on low speed for 5-7 minutes instead.
Either way, keep going until the dough feels smooth, elastic, and springs back when you poke it.
Let It Rise The First Time
Put the kneaded dough into a greased bowl and turn it over once so the top gets coated with a light layer of oil.
Cover the bowl with a clean kitchen towel. Set it in a warm spot in your kitchen and let it sit for about 1 hour, until the dough roughly doubles in size.
Shape Your Loaves
Press your fist into the center of the dough to deflate it, then divide it into two equal pieces. Take each piece and shape it into a loaf form, then place each one into a greased 9×5-inch loaf pan.
Cover both pans with the towel again.
Second Rise
Allow the shaped dough to rise for another 30-45 minutes.
The dough should puff up so it sits about 1 inch above the rim of each pan.
Bake The Loaves
Heat your oven to 350°F (175°C).
Once the oven reaches temperature, place both loaf pans inside and bake for 25-30 minutes. The tops should turn golden brown, and when you tap the bottom of a loaf with your knuckle, it should sound hollow inside.
Cool Before Slicing
Remove the pans from the oven and turn the loaves out onto a wire rack. Let them cool completely before slicing into them.
This cooling time lets the interior set up properly so the bread doesn’t fall apart when you cut it.
How To Improve Cooking Amish White Bread
How Can Ingredients Be Swapped in Amish White Bread?
What Goes Well With Amish White Bread
Easy Storage Solutions For Amish White Bread
FAQs
What does it mean when the yeast gets frothy?
The yeast is waking up and getting active. That frothy layer tells you the yeast is alive and ready to make your bread rise. If you don’t see any bubbles after 10 minutes, your yeast might be old or the water temperature was off, so start over with fresh yeast.
Can I use a stand mixer instead of kneading by hand?
Yes, a stand mixer does the job perfectly. Use the dough hook and mix for 5-7 minutes until the dough looks smooth and stretchy. Your arms get a break, and the results are the same.
How do I know when the dough has doubled in size?
Look at where the dough reaches in the bowl before the rise. When it fills the bowl to about twice that height, it’s ready. A gentle poke with your finger should leave a small indent that doesn’t bounce back right away.
What if my dough is too sticky or too dry?
Sticky dough needs a bit more flour sprinkled in, about a tablespoon at a time. Dry dough that won’t come together needs a splash of water. The dough should feel soft and slightly sticky but not wet.
Amish White Bread Recipe
- Total Time: 2 hours 10-15 minutes
- Yield: 2 1x
Description
Amish white bread is a simple, honest loaf that fills your kitchen with warmth while it bakes, and the tender crumb makes it perfect for everything from morning toast to dinner rolls. Your family will notice how this straightforward dough; mixed with just a few basic ingredients; brings that homemade comfort to your table that store-bought bread simply can’t match.
Ingredients
Dry ingredients:
- 5.5 cups all-purpose flour
- 1.5 tablespoons active dry yeast
- 0.67 cup granulated sugar
- 1.5 teaspoons salt
Wet ingredients:
- 2 cups warm water
- 0.25 cup vegetable oil or melted butter
Instructions
- In a large mixing bowl, pour 2 cups of warm water heated to 110°F and stir in 2/3 cup of granulated sugar until the crystals dissolve completely.
- Sprinkle 1½ tbsp of active dry yeast over the sugar water and let it rest for 5-10 minutes until you see a foamy layer on top.
- Pour ¼ cup of vegetable oil into your yeast mixture along with 1½ tsp of salt and stir everything together.
- Add 3 cups of all-purpose flour to your mixture and stir until your dough looks smooth and even.
- Gradually add more flour, ½ cup at a time, until your dough pulls away from the bowl’s sides but still feels slightly tacky to your touch.
- Transfer your dough onto a floured surface and knead it for 8-10 minutes by hand, stretching and folding until the dough becomes smooth and springs back when you press it.
- Place your kneaded dough in a greased bowl, turning it so all sides get coated with oil.
- Cover your bowl with a clean kitchen towel and let it sit in a warm spot for about 1 hour until your dough roughly doubles in size.
- Push your fist into the center of your risen dough to deflate it, then divide it into two equal pieces.
- Shape each piece into a loaf by rolling and tucking the edges, then place them into two greased 9×5-inch loaf pans.
- Cover your pans with a towel and let them rise for 30-45 minutes at room temperature until your dough peaks about 1 inch above the pan rims.
- Heat your oven to 350°F and bake your loaves for 25-30 minutes until the tops turn golden brown and tapping the bottom produces a hollow sound.
- Remove your loaves from the pans and set them on a wire rack to cool before slicing into them.
Notes
- Warm water should feel like bathwater on your wrist; around 110°F; because water that’s too hot kills the yeast and water that’s too cold won’t activate it properly.
- If your kitchen is cold, place the dough in a turned-off oven with the light on, or set it in a warm spot like on top of your refrigerator, since a consistent warm environment helps it rise evenly.
- Don’t skip the second rise in the pans, as this step gives your bread that classic tall, fluffy texture rather than a dense loaf.
- Tap the bottom of a finished loaf with your knuckle; if it sounds hollow, the bread is done, but if it sounds dense, give it another 5 minutes in the oven to bake through completely.
- Prep Time: 1 hour 45 minutes
- Cook Time: 25-30 minutes
- Category: Donuts & Breads
- Method: Baking
- Cuisine: American
Nutrition
- Serving Size: 2
- Calories: 900 kcal
- Sugar: 43 g
- Sodium: 1420 mg
- Fat: 14 g
- Saturated Fat: 2 g
- Unsaturated Fat: 12 g
- Trans Fat: 0 g
- Carbohydrates: 190 g
- Fiber: 6 g
- Protein: 18 g
- Cholesterol: 0 mg
Wanda Hamilton
Founder and Recipe Editor
Expertise
Bold Weeknight Cooking, Pantry Powered Meals, Sauce and Spice Building, Seasonal Ingredient Swaps, Recipe Testing and Troubleshooting, Food Photography and Simple Styling
Education
- Degree: Associate of Applied Science in Culinary Arts
- Focus: Core culinary skills built through practical kitchen training, with a strong foundation for real service work.
National Registry of Food Safety Professionals (NRFSP)Wanda Hamilton, Founder and Recipe Editor, cooks from Savannah, GA with a “big flavor, low fuss” mindset. Trained in Culinary Arts at Bellingham Technical College and certified in food safety through the NRFSP, she blends professional skill with everyday practicality. Wanda is known for smart finishing touches that elevate a dish in minutes, along with rigorous testing standards and clear visual cues that remove the guesswork. Her goal is simple: make every meal feel like a small but satisfying upgrade to your day.